Showing posts with label tutorials. Show all posts

Monday, June 24, 2013

Tutorial: Striped Backgrounds in Paint Shop Pro

Stripes are a pretty popular effect.  I've said before that I think they're more useful as an accent than as a main background, but I know a lot of folks who like striped backgrounds.  There are several ways to create striped backgrounds in Paintshop Pro.  This tutorial will take a look at all the methods and give some tips on other cool things you can do using a simple stripe pattern as a base.

All of the patterns and example images from the tutorial are free to use for any creative purpose.  You may not re-package or re-sell as resources.

Text content of the tutorial may not be re-used or reprinted without written permission.

Warning: This tutorial is long and image heavy.


Program: Paint Shop Pro (Any version)
Difficulty: Beginner to Intermediate (Tutorial has multiple methods; some may be easier than others, but detailed explanations are provided)
Translatable: Partly (Methods 2 and 4 should work in any program that has basic selection tools and an offset filter/effect.)


Friday, June 21, 2013

PSP Basics #5: Getting Content into PSP

The most common way to get content into Paint Shop Pro is with the open dialog. Corel's help file is here.  It's fine for anyone who understands how the menu works, but it doesn't give much information for a beginner.

To start, go to File>Open, press "Ctrl + O" ("Cmd + O" on a Mac) or press this button on your toolbar.

This dialog box opens up:
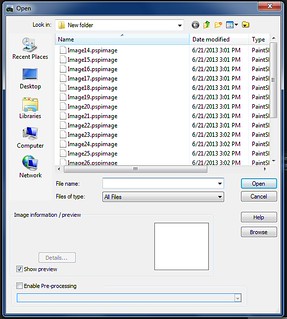
open-open

 I'm going to assume that you are familiar enough with computers that you won't need a total breakdown of the open screen.

As with most programs, simply point and click where you want to navigate, or use the standard icons at top of the window to brows in different folders.  Use ctrl or shift to select multiple files.

The features I really want to look at are the ones specific to Paint Shop Pro.  My favorite is the "favorite paths" icon.  This lets Paint Shop Pro store the directory path to locations you use a lot.

For example, most of my content for this blog is stored on an external drive.  I can navigate to that drive, or to folders on it that I use often, then click "add current" and the folder location will be saved so I can get there in one click the next time.

This feature is available from almost any dialog in the program, but each one operates independently, so a path you save in the open dialog won't necessarily appear in other menus or dialog boxes.

Clicking the "show preview" checkbox will allow you to see a thumbnail of the image you're opening.  It's usually adequate for browsing through your folders.  If you want to see more images at once, you can click the "browse" button.

In older versions of PSP, the browse button will open a separate menu that looks like this.  In PSP X5, the browse button will change your workspace to the manage pane and show your thumbnails in the new organizer  I've never really cared for either of these features.  They're slow to load on my computer, and I prefer to drag and drop files directly from Windows Explorer anyway.  I'll talk more about that further down.

In either case, you can browse and click on your images to add them to the program.

Another option for loading content is to import it via a camera or scanner.

Going to file>Import>From scanner or camera will tell PSP to detect any such device that is currently networked to your computer.  Since each set-up is different, you'll have to rely on the program wizard or Corel's help files for more specific information.

PSP also has a screenshot function, which you can access by going to File>Import>Screencapture.  I'll be doing a separate quick tip on the screencapture menu in the near future.  For our purposes, the first time you use it, you need to click "Set-up." after that, you can take screencaptures easily by pressing Shift +C.

The easiest way I've found to get material into PSP is by dragging and dropping it from Windows Explorer.  I set my program up in windowed mode (rather than full screen) then open the folder I want in Windows Explorer and set the window up like this.  Then I can quickly get to whichever images I want without having to wait for the organizer or the browse images feature to load.

Thursday, May 30, 2013

PSP Basics # 4: The Halftone Effect

I started writing this as part of a separate tutorial I was working on, then I decided that I might as well do a PSP Basics on it.  This is a pretty versatile set of effects in Paint Shop Pro and I use it for a lot of different kinds of work.

"Halftone" is a method of printing that is commonly used in newspaper, comics, and magazines.  Dots of different sizes, shapes, or colors are used throughout an image to simulate darker or lighter shading an degrees of depth.  (Have you ever noticed that if you look closely at the pictures in a newspaper or magazine, you can see small dots?  That's halftone printing.)

Halftone effects have also become popular in graphic art and design.  Search "halftone" or "halftone brush" and you'll see what I mean.

Photoshop has a few different ways of creating halftone effects.  PSP has one, but there are a lot of settings and ways you can apply them.  Let's take a look.

Saturday, May 25, 2013

Copyright and What it Means to You


I've been working on this a little a time since January, before I hurt my arm.  It's a sort of follow up to a post I made about Creative Commons licenses.

This work is now available as part of the text Copyright answers on Amazon.com


Saturday, April 27, 2013

PSP Basics #2-The New Image Dialog

Most tutorials I've seen will instruct you to create a new image and give you some dimensions.  I don't think I've seen one that explains what the various settings in the New Image box mean.

Corel's help file on the subject is here.  Like most of their help documents, it's useful, but it may be a little opaque for a beginner.  Here's a simpler version in plain english.

Tuesday, April 23, 2013

PSP Basics: A Quick Tip Series

Corel has a nice series of help videos and tutorials on Youtube, but I think they're a little inaccessible for beginners.  This is a quick tip series designed to help you find and understand the basic menu features and functions you'll use regularly, or things I think might make your life a little easier.

It will be updated whenever I have something to fit in it, no particular order, so if there's something you would like to see or a question you have, let me know and I'll see what I can do.

They're written for PSP X5, but they should be applicable to older versions.
I also have PSP 8, so I'll try to cover differences between the two.

1. Change Your Default Workspace (Get Rid of the Manage Pane)
2. The New Image Dialog
3. Working With The Materials Palette
4. The Haftone Effect
5. Getting Content Into PSP

Saturday, April 6, 2013

Quick Tip: Tiling Watermark Pattern in PSP 8

One of the first tutorials I wrote on Encompass Rose Design was a how-to on creating a raised watermark.  That one works nicely if you just want a signature or other information in one spot, but what if you are creating reference material or providing samples of material? Here's a quick way to protect your content and still have it be serviceable as a sample.


Program: Paint Shop Pro.  Mine was done in PSP 8 but it will work in any version.
Difficulty: Beginner to intermediate.  The steps are not hard, but the tutorial has less explanation and fewer screenshots than I would typically do for a beginner.
Translatable: Should work in most image programs, depending on how yours handles tiling patterns.

Wednesday, March 13, 2013

Tutorial: Texture From Scratch In Paint Shop Pro 4


Wow, I never thought I would miss doing these so much.  I have a lot more ideas that I've been saving up since I hurt my hand/arm a few months ago.  This was the simplest one I had, so I opted to try it first.

Here's a quick way to make a cool abstract background.  Use it as a desktop wallpaper, a texture overlay or whatever you want.  It involves using a single circle brush and the brush variance palette.

This is going to be an intermediate level tutorial.  My hand's not up to all the explanation involved in a beginner's tutorial  It's not difficult at all; it will probably take 15-20 minutes.  It assumes you have a solid working knowledge of Paint Shop Pro.  If you're a beginner and you'd like to try it, feel free to comment with questions.

Notice: Tutorial content is copyright Rose B. Fischer and may not be republished in any form without permission.

Program: Paint Shop Pro (Any version)
Difficulty: Intermediate (Tutorial assumes a good grasp of program menus and basic functions.  If you need more detailed help, feel free to ask questions.)
Translatable: Will work in any version of PSP; concepts should be translatable to most other imaging programs, but I don't know.


Friday, February 15, 2013

Stock From Stock-An Illustrated View

I've been wanting to make a tutorial on composites that rely on blending of shapes and colors since those are my favorite sort of texture to make, but my arm isn't cooperating.  So I decided to do this post instead, and if there's enough interest, I will go back and do a full tutorial another time.

I have no problem with other artists creating stock and resources out of mine, as long as anyone who does so is willing to share what they make freely under the same terms.  I see more and more resource providers who don't allow stock to be made from theirs--which is absolutely their right.  The problem is, a lot of them also seem to spend as much time worrying about "stolen" stock or being credited for their work as they do having fun with their art.  It seems awfully counterproductive to me, and I set up this post as an illustration of why.

The full sized versions of the textures below are 2500x2500 px
and 1414x2100.  A zip file is in this post.

Monday, January 21, 2013

Tutorial: Texture From Scratch In Paint Shop Pro (3)

My texture tutorials are getting a lot more hits than I expected.  Am I allowed to say that?

I didn't really expect them to get much traffic because I use PSP, which is not as popular as Photoshop or GIMP, and I've been writing about texture effects you can make without a camera or stock photos.

I mostly learned to make these because I could never really find the "perfect" one I wanted, and I (sadly) don't own a good camera for photography.  So now I have been thinking about some other tricks I use.

This idea is a simple use of the "Add Noise" feature and various types of blur that are present in PSP.
It will help to know a little about blend modes, but if you don't, it's okay; the tutorial will cover what you need to understand.

The tutorial looks long because I have broken the steps down with explanation for beginners, but once you understand what it is I'm showing you, the basic effect only takes about a minute to produce, and the  twirly colors don't take that much longer.

I think the results are quite pretty if you're looking for a background for a fantasy design or something kind of girly.  :)

Visit this post for a zip download of the four finished textures.
Please note: The zip only contains the finished textures.  It does not contain PSP layer files or PSD files.


Program: Paint Shop Pro 8

Difficulty: Beginner

Translatable: Partially (uses radial blur, but it's possible to skip that step or use another effect)


Saturday, January 19, 2013

Copyright, The Creative Commons, Courtesy, and You

I decided to create a new group on DeviantArt this week.  The group's called PSP-Works and I'm going to be uploading some resources that are specifically designed for the group.  (Mainly PSP-specific content like gradients or preset shapes.)

So I was writing up a special TOU doc tonight, and it got me thinking.  I've been contemplating writing this post for months and I just haven't had the time or motivation.


I love the internet.  I love its potential as a tool for sharing and building, especially when it comes to creative content.  That's what the Creative Commons is meant to help accomplish.


This work is now available as part of the text Copyright answers on Amazon.com

Thursday, January 17, 2013

Tutorial: Making and Using Custom Gradients In Paint Shop Pro


Program: Paint Shop Pro (Should work for most versions.)
Difficulty: Beginner
Translatable: Sorry, not this time!

The gradient tools in Paint Shop Pro are set up a lot differently from the ones in the other programs I've seen. They can seem a little daunting at first, but once you get used to them, it's pretty simple. I'm going to show you step by step how to make and save custom gradients.

I have 2 versions of PSP on my computer.  PSP 8 was made by JASC Software.  The latest version, PSP X5 was made by Corel (which bought out JASC several years ago.).

For compatibility purposes, I try to make my gradients in the older version.  I'm doing most of the work in PSP 8, but I include screenshots and directions for both programs.  The gradient editor hasn't really changed from one version to the other.   So, no matter which version you have, you should be able to follow along.


Click here for a set of gradients I made using the images in this tutorial.  It contains all of the ones in the examples and a bunch more.

Notices: Images used in this tutorial are public domain.  Links to the originals are provided in the text.
Tutorial content is (c) Rose B. Fischer and Encompass Rose Design.  It may not be reprinted without express permission.

Wednesday, January 16, 2013

Quick Tip: File Locations in Paint Shop Pro


This applies to any custom content that you want to make in PSP.

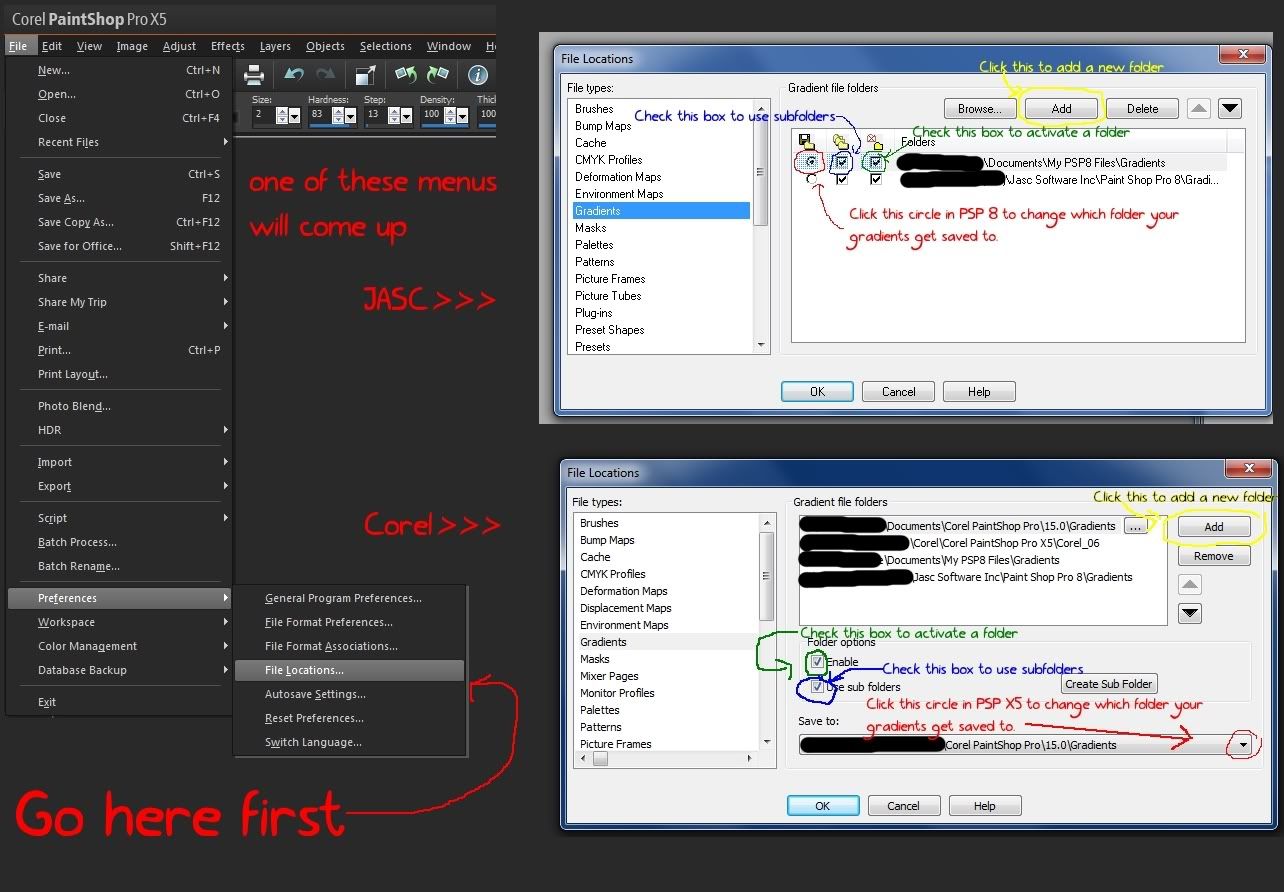
Paint Shop Pro allows users to specify any number of custom locations for their files.  You don't have to have one specific folder for your gradients or brushes, but it's good to know where the files are so that you can back them up or find them if you want to share them.

Since I make content to share online, I create a new subfolder for each set. You don't need to if you will only be making a gradient here or there, but it's good if you plan to make a lot of them or if you download custom content made by others.  Otherwise it will be hard to keep track of where the files are stored and who made them.


  See Ex-1 for a quick overview.  Detailed instructions are below.

Sunday, January 13, 2013

Tutorial: Textures From Scratch In Paint Shop Pro (2)


Program: Paint Shop Pro

Difficulty: Beginner.  I try to provide detailed explanations for anyone who needs them.  The detailed instructions are set off a little from the main actions in each step, so if you don't need them, just skim down.

Translatable: Should Work For Any Program With Layer Support and Basic Brush Variance Capabilities.

My last "texture from scratch" tutorial is still getting a lot of hits, so I wanted to make another one.   I am using PSP X5, but I tried to only use materials that come standard with PSP 8 so most people should have no problem following along.  The techniques will work with any custom materials and brushes you have as well.  I chose to use the standard program tools because they are available to anyone using Paint Shop Pro.

This uses the brush variance palette to create texture effects from the standard PSP brushes.  I don't provide my exact brush variance settings because I don't remember them because I think it's more fun to experiment than to copy someone's precise settings.

Notices: This texture is free for any use, but you may not re-upload or redistribute it as is.
Written content is (c) Rose B. Fischer/Encompass Rose Design and may not be republished without written permission.

Wednesday, January 9, 2013

Tutorial: Greeting Card Part 2, Create a Pattern Fill


Tutorial: Greeting Cards Part 1: Set up the card


Tutorial: Greeting Card Part 3, Create the Front Image


Tutorial: Greeting Cards Part 4: Creating the Back


Tutorial: Greeting Card In PSP: Index


Program: Paint Shop Pro (I used both PSP X5 and PSP 8; it should work in other versions.)

Difficulty: Beginner to Intermediate.  

This is not a hard project, but it takes some time.  I tried to include detailed explanations  and lots of screenshots for beginners, so it's a long tutorial. It uses only basic program functions, but there are lot of steps to complete the project.  If you're only interested in the front image, you can skip to Part 3. 


Translatable: Should work in any program that has a guides feature and supports layers.
A little early, but I thought that it would give you plenty of time to utilize the tutorial if you'd like to.

Info and links below.


Wednesday, January 2, 2013

Quick Tip: Rendering Clouds In Paint Shop Pro


 I started writing a tutorial last week on a graphic with a textured background that requires  a cloud render.  I realized that this could also be a stand-alone post (and it was making my tutorial really longer than I wanted) so here it is.