
Corel's help file on the subject is here. Like most of their help documents, it's useful, but it may be a little opaque for a beginner. Here's a simpler version in plain english.
To create a new document go to File>New.
This window appears:
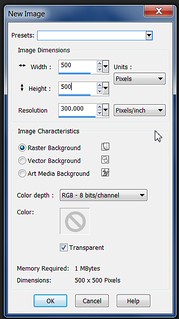
The Presets area has a dropdown menu that contains some common settings you'll find used a lot in both graphics and print media.
I'm not sure but I think I imported presets from PSP 8 over into PSP X5 because there were some useful ones that X5 didn't have anymore, so yours may be different.
To access the dropdown, you click that triangle at the end of where it says Presets.
To save a new preset, you can click the save icon that appears on the side of the dropdown.
*Note: This is a little different in the older Jasc versions of the program like PSP 8. There, the save icon is located right after the word "presets."
Underneath the save icon, you have an arrow icon that looks like an "undo" symbol. This will revert the settings in the dialog to the default program settings.
Next, there is a resource manager icon. This is what you use if you want to rename, copy, or delete a preset. It replaces the old "delete" icon from earlier versions.
And finally there is the "file locations" icon. That's what tells PSP where to look for your presets and saved files. (You can find a quick tip on file locations here.)
The Image Dimensions Area is where you'll choose the size and shape of your canvas.
Height and Width can be changed either by typing values in the boxes or by clicking the arrows and sliders.
The units box is where you'll decide whether you want to measure your project in pixels, inches or centimeters. The dropdown menu can be accessed by clicking on the arrow, just like the presets button.
The canvas will be the same no matter which units of measure you're using; it's mainly a matter of preference or whether you're working for print or the web.
Resolution refers to how many pixels will be used to fill in each unit (either inches or centimeters) on the canvas. The higher the number in the box, the more detail your image will have when it's printed. (Most computer monitors have a standard resolution of 72 ppi, so a higher resolution image will look the same on your computer screen, but you may notice a difference when you print. Lower resolution images need to be printed smaller in order for the detail to stay clean.) Change the resolution either by typing a number in the box or using the sliders.
The Image Characteristics Area is where you decide what kind of background you want your project to have and set some other traits that will affect the quality of your printed image. This area also gives you some information about the document you're creating.
There are three background types you can choose from.
Raster backgrounds are the main type you'll probably be using. They're a standard feature you'll find in most image programs.
Vector backgrounds are used when you'll be working exclusively with the pen tool, preset shapes, and curves. Although they're somewhat harder to work with, vector graphics can be resized without losing quality and are often used for illustration and other print projects.
Art Media backgrounds are for use with the art brush. The art brush simulates various traditional painting styles and methods, depending on what settings you choose.
Color depth refers to the number of colors that each pixel in your image can display. Fewer colors mean a smaller file size but lower image quality, among other things. You change it by clicking the button for a drop down menu.
If you want a more detailed, explanation, Corel's help file is here.
Color is simply the background color of the image. I usually work on a transparent background so that I can add and delete layers without having a background interfere. You can always add a color layer if you want a background later.
Memory Required is pretty self explanatory. It refers to the amount of computer memory that your project will use when it opens.
And that covers the entire menu. I hope this helped you. Keep an eye on the blog for more quicktips in the future!
No comments:
Post a Comment