
I started writing this as part of a separate tutorial I was working on, then I decided that I might as well do a PSP Basics on it. This is a pretty versatile set of effects in Paint Shop Pro and I use it for a lot of different kinds of work.
"Halftone" is a method of printing that is commonly used in newspaper, comics, and magazines. Dots of different sizes, shapes, or colors are used throughout an image to simulate darker or lighter shading an degrees of depth. (Have you ever noticed that if you look closely at the pictures in a newspaper or magazine, you can see small dots? That's halftone printing.)
Halftone effects have also become popular in graphic art and design. Search "halftone" or "halftone brush" and you'll see what I mean.
Photoshop has a few different ways of creating halftone effects. PSP has one, but there are a lot of settings and ways you can apply them. Let's take a look.
This dialog pops up:
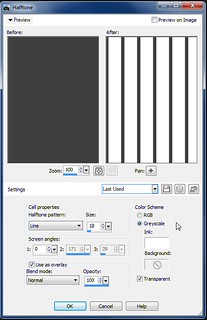
The first thing you want to do is look at where it says "cell properties." The default setting is a round pattern. If you click the word round, you'll be given a drop down menu where you can choose which pattern you want. You can also change the size by using the sliders or typing a number in the "size" option box.
Next, go to where it says "color scheme." Don't worry about the screen angles for now, we'll get to that in a minute.
The color scheme options can be a little confusing because the "grayscale" option isn't really limited to shades of gray.
With "grayscale" checked, you can use any two colors you want--one for the background and one for your halftone pattern.
If you click the checkbox that says "transparent," the halftone pattern will show up against a transparent background. Whatever background you had to start with just gets deleted.
If you click "RGB" you'll get three patterns, or three "screens", which can each be set to a different angle. This is where the screen angle boxes come in. The colors are limited to Red-Green-Blue and the background will be black.
The "use as overlay" box can be checked on or off and allows you to layer a halftone pattern over your existing image or background. The effect utilizes the same blend modes and opacity function as your PSP layers palette and will give you a variety of results with the same basic halftone pattern.
(I'll be doing a tutorial on blend modes in the future, so check back if you're not familiar with how they work. My best advice is to just experiment with the different blend mode settings and see what they do.)
If you find a setting you like, you can click the save icon to save everything as a preset. PSP 8 comes with a lot of useful presets, so if you're using the older versions, I suggest you check them out.
I hope this has helped you. Keep an eye on the blog for more quick tips in the future!
No comments:
Post a Comment