
Corel's help file on the materials palette is here, and it's pretty comprehensive. This article is more simplified and it's just to show you how to get to the materials you want to use quickly and simply.
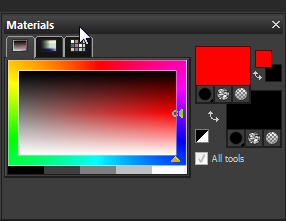
This box is your materials palette:
If you don't have a box like that on your screen, go to View>Palettes>Materials.
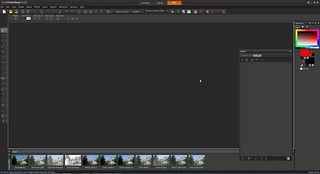
When you first start using PSP, your workspace will probably look more like this:
I don't like mine that way and there are some other palettes I use regularly, so I move mine by clicking and dragging on the top bar where it says "materials." Mine usually looks more like this:
You'll see three tabs in the top area of the box. Here's an overview of what they are and how they work.
Frame Tab presents your colors in a rectangular gradient of hues. You can change colors either by moving the sliders around the frame or just by clicking your mouse anywhere inside the color frame. A left click will change your foreground color. A right click will change your background color.
Rainbow Tab works basically the same way as the frame tab. It presents your colors in a spectrum and you pick them by hovering your cursor and clicking on the are you want.
Swatches Tab is where you can access any materials that you've saved and want to use again. I use this for a lot of color and texture fills or gradients with specific properties so that I can load them again without having to try to remember exactly what I did. You switch materials by clicking on the small icons.
The two big squares beside your color picker tabs are your foreground (or stroke, if you're working with vectors) and background properties. They'll contain either a color, a pattern, or a gradient, and their purpose is to show you which material you've currently selected and any attributes you've changed (like if you set your gradient to repeat or turned your pattern to an angle.)
Moving your cursor over one of them will change the mouse to an eyedropper. If you hover for a second, you'll see a tooltip appear that will give you information about the materials you're using.
If you right click on one of the boxes, you'll get a list of recently used materials you can choose from. Handy if you're creating a coordinated set.
If you left click in the center of the boxes, a dialog box opens
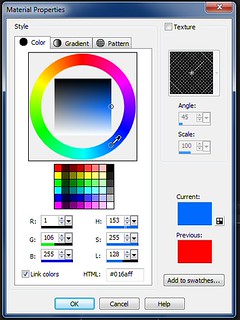
This is your material properties dialog and it's the main way that I use to select colors, gradients, or patterns.
There are three tabs. The colors tab is pretty straightforward. You select colors either by clicking the color icons or by moving the little sliders and arrows around the color wheel diagram. (Or you can just click your cursor anywhere in your PSP window.
Next is the gradients tab. I've already done a pretty extensive tutorial on gradients here, so I won't go into a lot of detail on the gradient tab.
The pattern tab is where you can select seamless patterns. In PSP you can scale your patterns, change their angles, and even add texture to them right from the properties dialog. I really enjoy this aspect of PSP because it means I can often utilize the same pattern at different scales and angles to create a whole variety of effects in a matter of seconds.
You can select a pattern by clicking here.
Change the angle or the scale by moving the sliders that say "scale" or "angle". Another way to change the angle is simply clicking on the thumbnail image and moving it around. I don't do this very much because I want my angles to be precise, but you may find it useful if you don't want to niggle the sliders and you're just looking for a cool, quick effect.
Add texture by clicking the texture check box in the top corner and then selecting one from the list of thumbnails.
You can view or add to your swatches by clicking on the swatch button.
*Note, the scale, angle, swatch and texture features will also work in the gradients tab. Texture works in the color tab as well, but scale and angle aren't really relevant there.
Let's click out of the properties dialog and look at the rest of the main palette area.
In Photoshop, there are a couple of material related tasks that you have to use your keyboard for. You can switch your foreground and background colors by pressing "X" on your keyboard, and you reset your default colors (black and white) by pressing "D". Those shortcuts don't work in PSP, so you might be confused if you've used Photoshop before.
In PSP, you switch between foreground and background by clicking here. (Unless you're working with vectors or text, though, you don't need to switch them at all. Left click to paint or draw with your foreground color; right click to use the background color.)
You reset to black and white by clicking here in PSP X5. There is not a "default colors" shortcut in older, Jasc versions of the program.
Say that you want to quickly switch between a solid color and a gradient. You can do so without opening the properties dialog by clicking one of these icons. These will only switch to the last material you'd selected, but they're great time-savers if you're making a set with coordinated colors and patterns or something.
You can add a texture to any material by clicking here. Again, it only uses the last texture you selected from properties, but it's handy.
Set your background or foreground to transparent by clicking here. I find this most useful when I'm working with vectors; I usually want to paint with a color or pattern.
The last thing I want to show you is the two smaller squares behind your foreground and background properties. I admit, it took me a long time to figure out what these were for.
Say that you have your materials set up like this with a gradient in your foreground and a pattern background. The smaller squares will still show solid colors. They retain the last solid colors you used, or you can click on them and change the colors independently of the current gradient/pattern set you're working with.
This is handy when you're trying to set up a foreground/background gradient or you're working with different materials on the same canvas.
You can also swap them the same way you can with the bigger boxes.
I hope this tutorial has been helpful to you. Check back in a couple of weeks for more PSP basics.
No comments:
Post a Comment