
To start, go to File>Open, press "Ctrl + O" ("Cmd + O" on a Mac) or press this button on your toolbar.
This dialog box opens up:
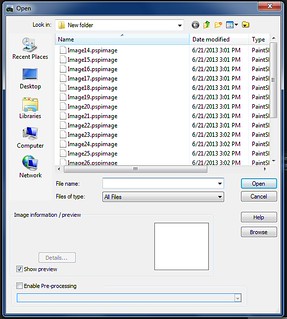
I'm going to assume that you are familiar enough with computers that you won't need a total breakdown of the open screen.
As with most programs, simply point and click where you want to navigate, or use the standard icons at top of the window to brows in different folders. Use ctrl or shift to select multiple files.
The features I really want to look at are the ones specific to Paint Shop Pro. My favorite is the "favorite paths" icon. This lets Paint Shop Pro store the directory path to locations you use a lot.
For example, most of my content for this blog is stored on an external drive. I can navigate to that drive, or to folders on it that I use often, then click "add current" and the folder location will be saved so I can get there in one click the next time.
This feature is available from almost any dialog in the program, but each one operates independently, so a path you save in the open dialog won't necessarily appear in other menus or dialog boxes.
Clicking the "show preview" checkbox will allow you to see a thumbnail of the image you're opening. It's usually adequate for browsing through your folders. If you want to see more images at once, you can click the "browse" button.
In older versions of PSP, the browse button will open a separate menu that looks like this. In PSP X5, the browse button will change your workspace to the manage pane and show your thumbnails in the new organizer I've never really cared for either of these features. They're slow to load on my computer, and I prefer to drag and drop files directly from Windows Explorer anyway. I'll talk more about that further down.
In either case, you can browse and click on your images to add them to the program.
Another option for loading content is to import it via a camera or scanner.
Going to file>Import>From scanner or camera will tell PSP to detect any such device that is currently networked to your computer. Since each set-up is different, you'll have to rely on the program wizard or Corel's help files for more specific information.
PSP also has a screenshot function, which you can access by going to File>Import>Screencapture. I'll be doing a separate quick tip on the screencapture menu in the near future. For our purposes, the first time you use it, you need to click "Set-up." after that, you can take screencaptures easily by pressing Shift +C.
The easiest way I've found to get material into PSP is by dragging and dropping it from Windows Explorer. I set my program up in windowed mode (rather than full screen) then open the folder I want in Windows Explorer and set the window up like this. Then I can quickly get to whichever images I want without having to wait for the organizer or the browse images feature to load.
No comments:
Post a Comment